
Happy Wednesday, friends! Today I want to share with you a project I recently completed that I’m really proud of! It’s a beautiful chandelier transformation! Come see how to add crystals to a chandelier!
A few months ago, my electrician friend, Bob came to our house to switch out a few light fixtures. Once he saw my love of chandeliers, he mentioned he had taken down a few chandeliers in his house and was going to get rid of them. He asked if I would like to have them and of course I said YES! So, he helped me load them in my car. (Isn’t this a wonderful sight?)

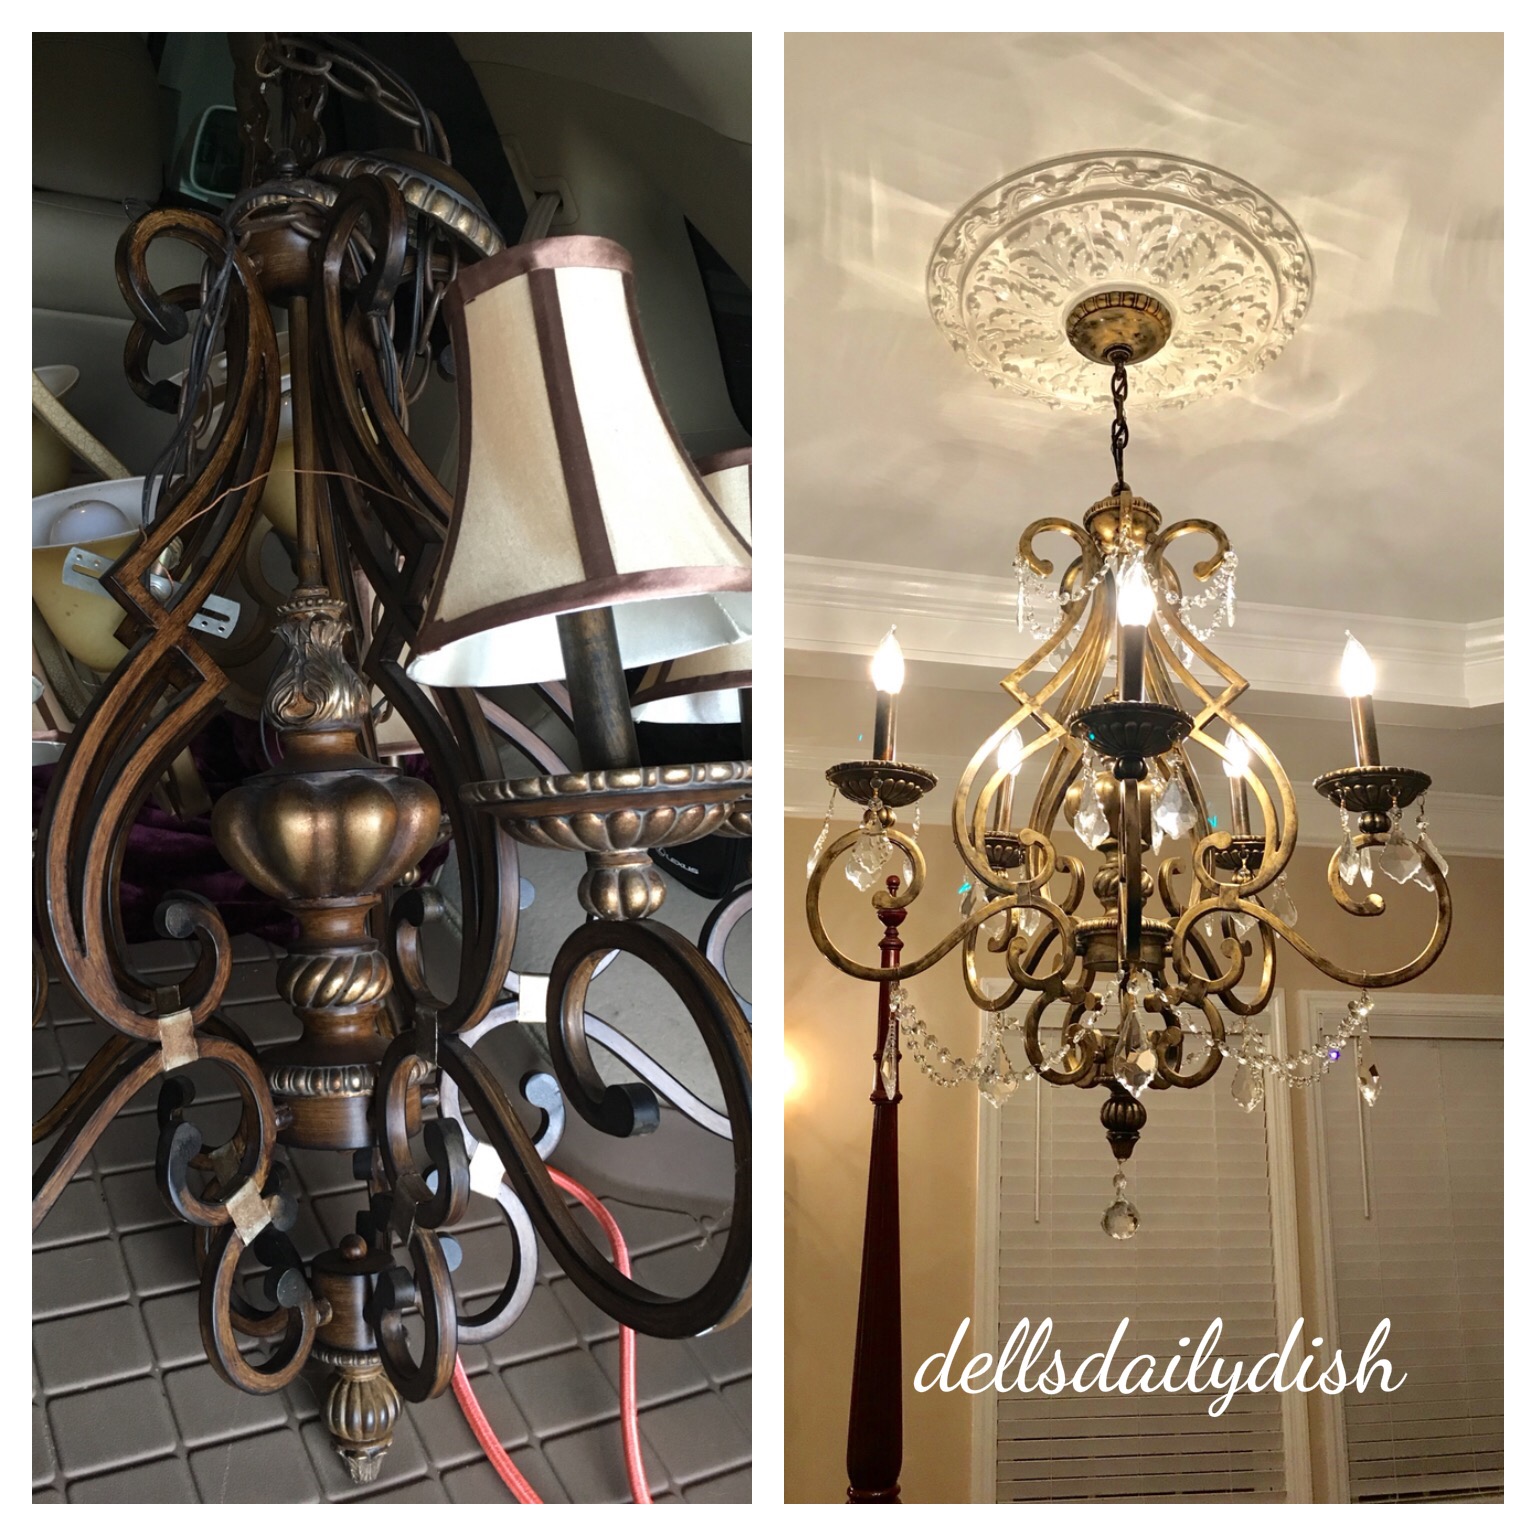
Meanwhile, my older sister was in the process of renovating her house in order to add a master suite. I knew she was looking for a chandelier for her future bedroom so I sent her a picture of this one from Bob. I told her if she liked it, I would give it a make-over for her. Of course she loved it! This is how it looked in the beginning:

The chandelier is heavy and has beautiful lines and features. I knew it would be perfect for my sister’s new master bedroom. The finish on the fixture was a bronze color, but I thought it would look better in gold leaf. So, I set to work. First I removed the shades, light bulbs and the socket covers and gave the entire fixture a good cleaning.

When I gold leaf a project, I like to start with a black base. I wrapped each light socket with plastic wrap to protect the wiring, then I spray painted the entire fixture with Rust-oleum black in semi-gloss. (You can use any sheen but I happened to have semi-gloss on hand.)

Using my favorite golf leaf technique, I dry brushed Rub ‘n Buff in Gold Leaf all over the fixture making sure to leave some black paint peeking through. This adds authenticity to the gold leaf. Look at the rich details! It already looks better!

I like to hang my chandeliers from the ceiling as I work on them so I can get to all angles.
 Because this light fixture didn’t have a place to hang crystals, I had to improvise. I ordered small gold jewelry bails on Amazon. You can find them here for $16.53 for a pack of 144. This is a close up of the jewelry bails. They come in different finishes, but I wanted gold to match the chandelier. See the little clip? I glued each bail to the chandelier with the flat part to the chandelier and the chip facing out.

I tried several different types of glues, but in the end Super-Glue worked best. (Just make sure you wear gloves so you don’t glue your fingers together.) I glued 5 jewelry bails around each bobeche and wherever else I thought crystals would look nice. This is my favorite type of crystals to use on large chandeliers. They are called “Large French Pendalogue Crystals”, are 2 ½ inches tall, high quality and affordable. I always add a bead or two of the octagon chain to the top, then add the crystal to the chandelier.

You can find them here: Clear Crystal Glass Pendalogue French Prisms. The jewelry bails didn’t hold well on the underside of the arms, so I ended up using thin gold jewelry wire to attach the chain and crystals. This worked much better, especially during the car ride to its new home.
I used this type of crystal bead chain. These come in 10 foot sections and are 14 mm glass octagon bead garland found on Amazon. They are high quality and real glass, for $11.45 plus free shipping with Prime. I use these for all of my chandelier projects. The sections are connected by thin o-rings and can easily slip over the jewelry bails once they are glued into place.

And here is how the chandelier looks in my sister’s new master bedroom! Gorgeous, right? I am so thrilled with the way this chandelier turned out! But happier my sister LOVES IT!

Can you believe the transformation of this chandelier? With a little bit of TLC this chandelier went from dated to dazzling! Nothing that a bit of gold leaf paint and crystals can’t fix!

What do you think? Did you know you can take practically any chandelier and make it into a crystal chandelier using these tips? Have you tried it? If so, please share! And if you like this make-over, dish it out to your friends! Thanks so much for stopping by! Have a fabulous day! xoxo Dell P.S. If you’d like to try any of the products shown here, simply click on the highlighted purple or green areas and the link will take you directly to the products!